
レイアウトについて、Grid、前回は、StackPanelについて紹介しました。

その名の通り、折り返してくれるレイアウトになります。
WrapPanelについて
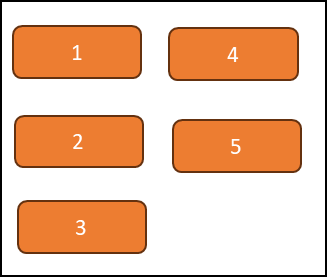
レイアウトイメージ
StackPanelと似ていますが、縦または横に配置しきれなくなると、折り返して表示してくれるのが、WrapPanelになります。
TextBoxコントロールにもTextWrappingプロパティというものがあり、折り返し方法を指定しますので、WrapPanelは折り返しパネルと訳すことができます。
配置方法
配置方法は簡単です。WrapPanelにコントロールを入れて配置すれば、あとは、Orientationプロパティに従って、水平方向または垂直方向に折り返して表示されます。
水平方向に折り返す場合は、下記のように水平方向でX座標の正の方向に配置し、配置しきれなくなると折り返して次の行から配置されます。

垂直方向に折り返す場合は、下記のようにY座標の正の方向に配置し、配置しきれなくなると次の列から配置されます。
レイアウトサンプル
これまでと同じようにHello WorldプロジェクトにWrapPanel用のウィンドウクラスを追加します。
今回は「WrapPanelLayoutWindow」という名前でウインドウを追加します。
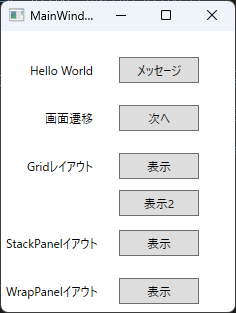
続けてメイン画面にWrapPanelサンプル表示用のボタンを追加します。
WrapPanelレイアウト表示用のボタンクリックイベントハンドラに次のように記載します。
    private void ButtonDisplayWrapPanelSample_Click(object sender, RoutedEventArgs e)
    {
        WrapPanelLayoutWindow window = new WrapPanelLayoutWindow();
        window.Show();
    }
WrapPanelLayoutWindow.xamlは、前回StackPanelで使用したサンプルをWrapPanelに変更して、折り返しがわかりやすくするために、ウインドウサイズを縮めます。
<Window x:Class="HelloWpfApp.WrapPanelLayoutWindow"
        xmlns="http://schemas.microsoft.com/winfx/2006/xaml/presentation"
        xmlns:x="http://schemas.microsoft.com/winfx/2006/xaml"
        xmlns:d="http://schemas.microsoft.com/expression/blend/2008"
        xmlns:mc="http://schemas.openxmlformats.org/markup-compatibility/2006"
        xmlns:local="clr-namespace:HelloWpfApp"
        mc:Ignorable="d"
        Title="WrapPanelLayoutWindow" Height="250" Width="300">
    <Grid>
        <Grid.RowDefinitions>
            <RowDefinition Height="*" />
            <RowDefinition Height="*" />
        </Grid.RowDefinitions>

        <WrapPanel Grid.Row="0" Orientation="Horizontal" VerticalAlignment="Top">
            <Button Content="操作A" Width="100" Height="30" Margin="5,0"/>
            <Button Content="操作B" Width="100" Height="30" Margin="5,0"/>
            <Button Content="操作C" Width="100" Height="30" Margin="5,0"/>
            <Button Content="操作D" Width="100" Height="30" Margin="5,0"/>
            <Button Content="操作E" Width="100" Height="30" Margin="5,0"/>
        </WrapPanel>

        <WrapPanel Grid.Row="1" Orientation="Vertical">
            <TextBlock Text="キャベツ" FontSize="18" Margin="3"/>
            <TextBlock Text="レタス" FontSize="18" Margin="3"/>
            <TextBlock Text="きゅうり" FontSize="18" Margin="3"/>
            <TextBlock Text="大根" FontSize="18" Margin="3"/>
            <TextBlock Text="もやし" FontSize="18" Margin="3"/>
            <TextBlock Text="トマト" FontSize="18" Margin="3"/>
            <TextBlock Text="じゃがいも" FontSize="18" Margin="3"/>
        </WrapPanel>
    </Grid>
</Window>
早速実行します。
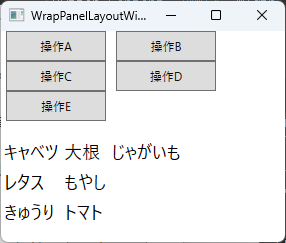
StackPanelをWrapPanelに変更したのみで、このようにコントロールの配置の仕方を変更することが可能です。
ウインドウサイズを変更すると、サイズに従って、入りきらなくなると自動的で折り返してくれることがわかります。自動で折り返してくれるのでとても便利なコントロールです。
![[商品価格に関しましては、リンクが作成された時点と現時点で情報が変更されている場合がございます。]](https://hbb.afl.rakuten.co.jp/hgb/487db422.b9a0363a.487db423.e9a0aebe/?me_id=1198667&item_id=10001266&pc=https%3A%2F%2Fthumbnail.image.rakuten.co.jp%2F%400_mall%2Fsawaicoffee-tea%2Fcabinet%2Fraknewthum%2F250215%2Fykb_t_rak.jpg%3F_ex%3D240x240&s=240x240&t=picttext "[商品価格に関しましては、リンクが作成された時点と現時点で情報が変更されている場合がございます。]")

コメント